
VALENTINE'S DAY TREATS ON KPLCTV MIDDAY

Mari and Terri
I crafted a quartet of delightful treats for a particular Valentine's Day segment on the KPLCTV Midday Show that will win hearts. First, I elevated the classic Rice Crispy Treats by incorporating brown butter, adding a nutty depth that complements the marshmallow's sweetness. Then, for a touch of elegance, I prepared chocolate-dipped strawberries, each berry enrobed in a glossy layer of dark chocolate, creating a perfect balance of sweet and tart. The third treat was Brown Sugar Cut-Out Cookies, which stand out with their rich molasses flavor and tender, crumbly texture, shaped into hearts and decorated with a sprinkle of sugar for a festive touch. Finally, the Red Velvet Whoopie Pies offered a decadent finish; these sandwich cookies feature velvety red cake layers with a creamy filling, embodying the spirit of Valentine's Day in every bite. Each treat was a feast for the eyes and a testament to the joy of baking with love.
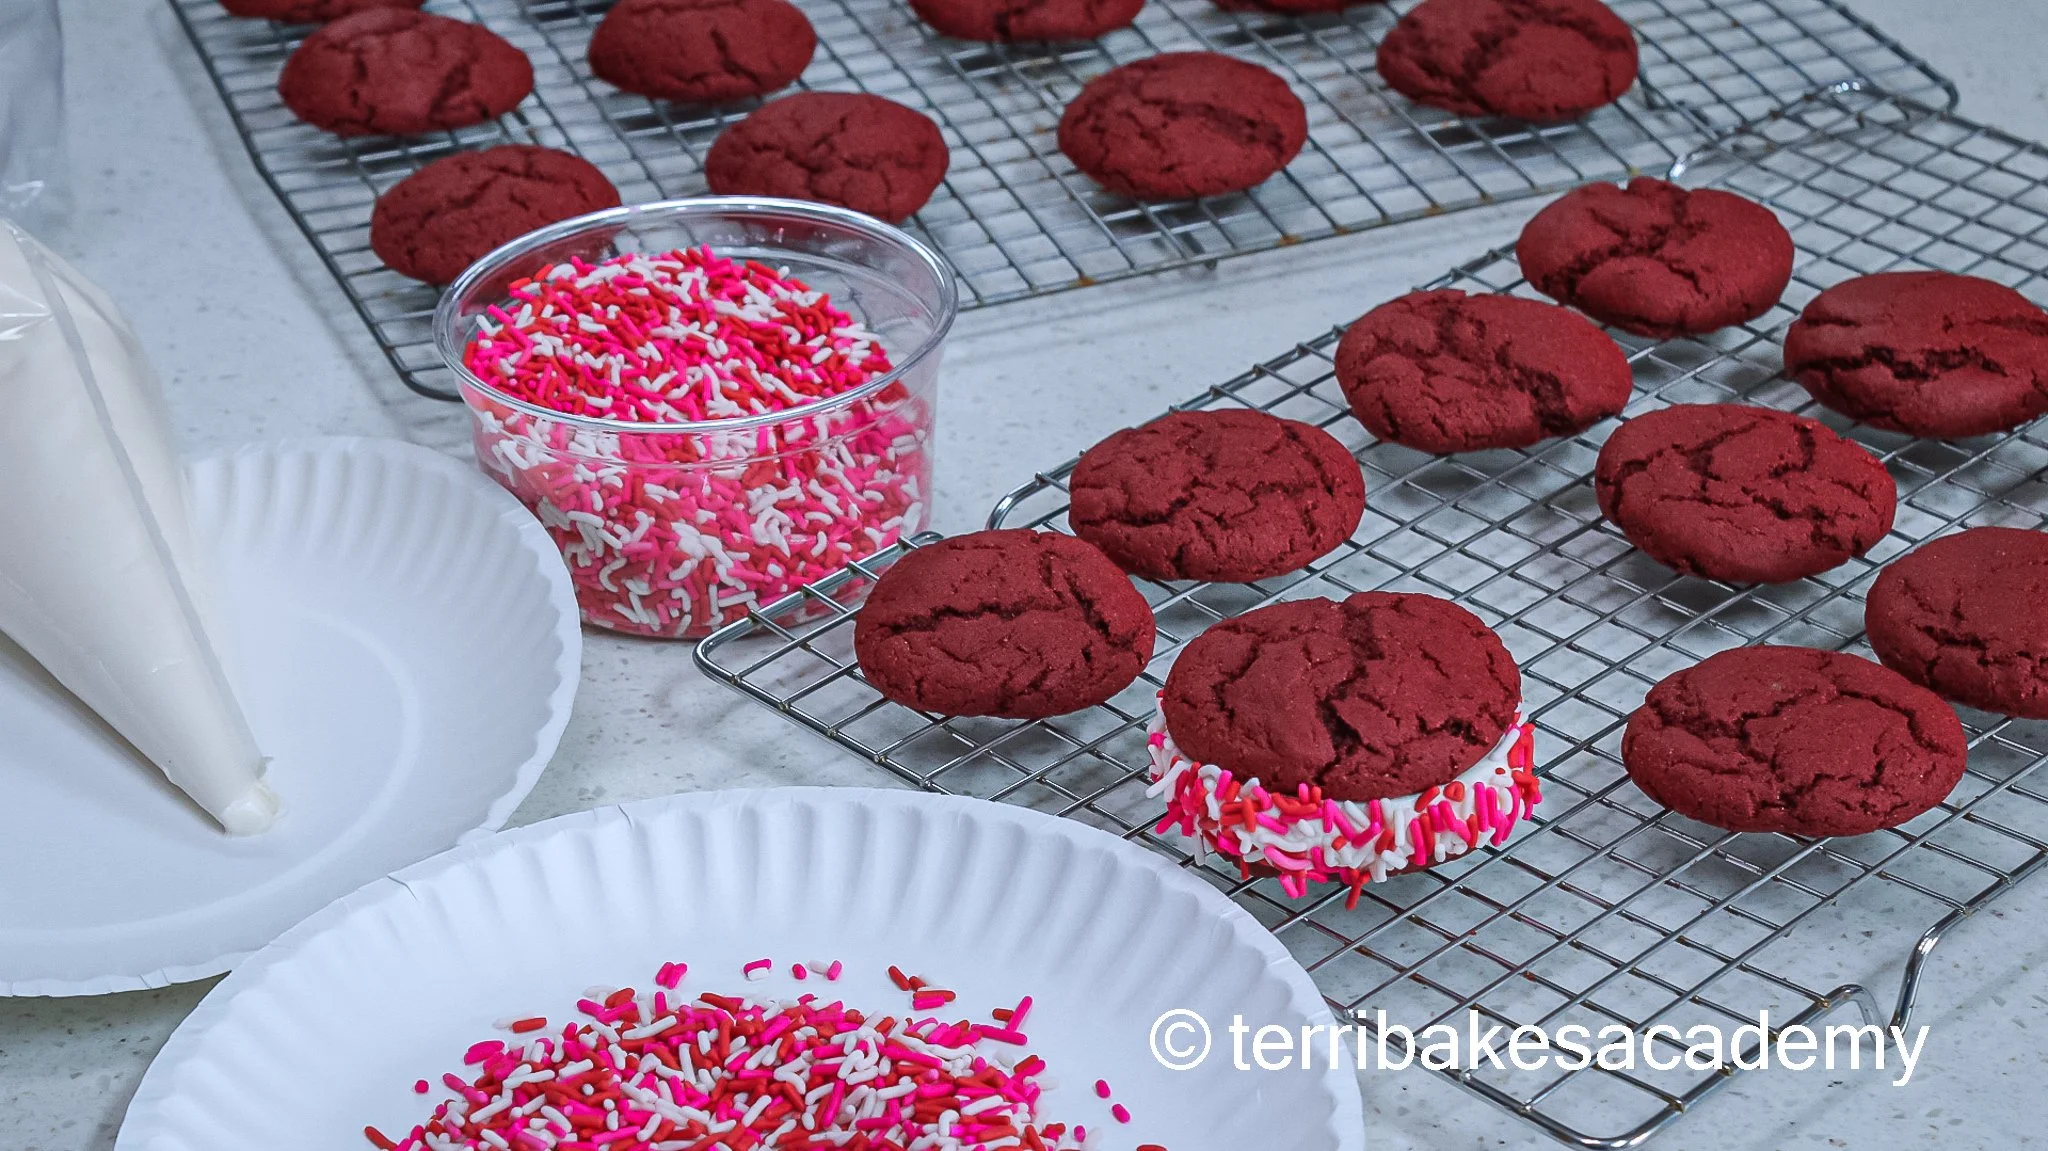
Red Velvet Whoopie Pies
Red Velvet Whoopie Pies
Red Velvet Whoopie Pies, made with a red velvet cake mix, is a delicious and easy dessert. Here's a simple recipe that uses a red velvet cake mix as its base, streamlining the process and ensuring a rich, vibrant color and flavor.
Ingredients:
For the Whoopie Pies:
1 box red velvet cake mix
1/2 cup vegetable oil
2 large eggs
1/2 teaspoon vanilla extract (optional for enhanced flavor)
For the Cream Cheese Filling:
8 oz cream cheese, softened
4 tablespoons unsalted butter, softened
2 cups powdered sugar, sifted
1 teaspoon vanilla extract
Instructions:
Preheat your oven to 350°F (175°C). Line baking sheets with parchment paper or silicone baking mats.
Make the Whoopie Pie Batter:
In a large mixing bowl, combine the red velvet cake mix, vegetable oil, eggs, and vanilla extract (if using). Mix until well combined and a dough forms.
If the dough is too sticky, refrigerate it for about 30 minutes to make it easier to handle.
Form the Whoopie Pies:
Use a small cookie scoop or a tablespoon to drop rounded, equally-sized pieces of dough onto the prepared baking sheets. Aim for about 1 to 1.5 inches in diameter.
Leave enough space between each dough ball, as they will spread during baking.
Bake:
Bake in the preheated oven for 8 to 10 minutes or until the tops are set and the edges start to crisp slightly.
Remove from the oven and let them cool on the baking sheets for 5 minutes, then transfer to a wire rack to cool completely.
Make the Cream Cheese Filling:
While the cookies cool, prepare the filling. Beat the softened cream cheese and butter in a medium bowl until smooth.
Gradually add the powdered sugar and vanilla extract, continuing to beat until the filling is smooth and creamy.
Assemble the Whoopie Pies:
Once the cookies have cooled, match them up in pairs based on size.
Spread or pipe a generous amount of cream cheese filling on the flat side of one cookie of each pair, then gently press the second cookie on top to create a sandwich.
Serving:
Serve immediately, or store in an airtight container in the refrigerator to firm up the filling a bit before serving.
Tips:
After filling, roll the edges of the whoopie pies in sprinkles or mini chocolate chips for a festive touch.
Ensure all ingredients for the filling are at room temperature to achieve a smooth, easy-to-spread consistency.
Using premade canned cream frosting is another shortcut.
Enjoy your homemade Red Velvet Whoopie.
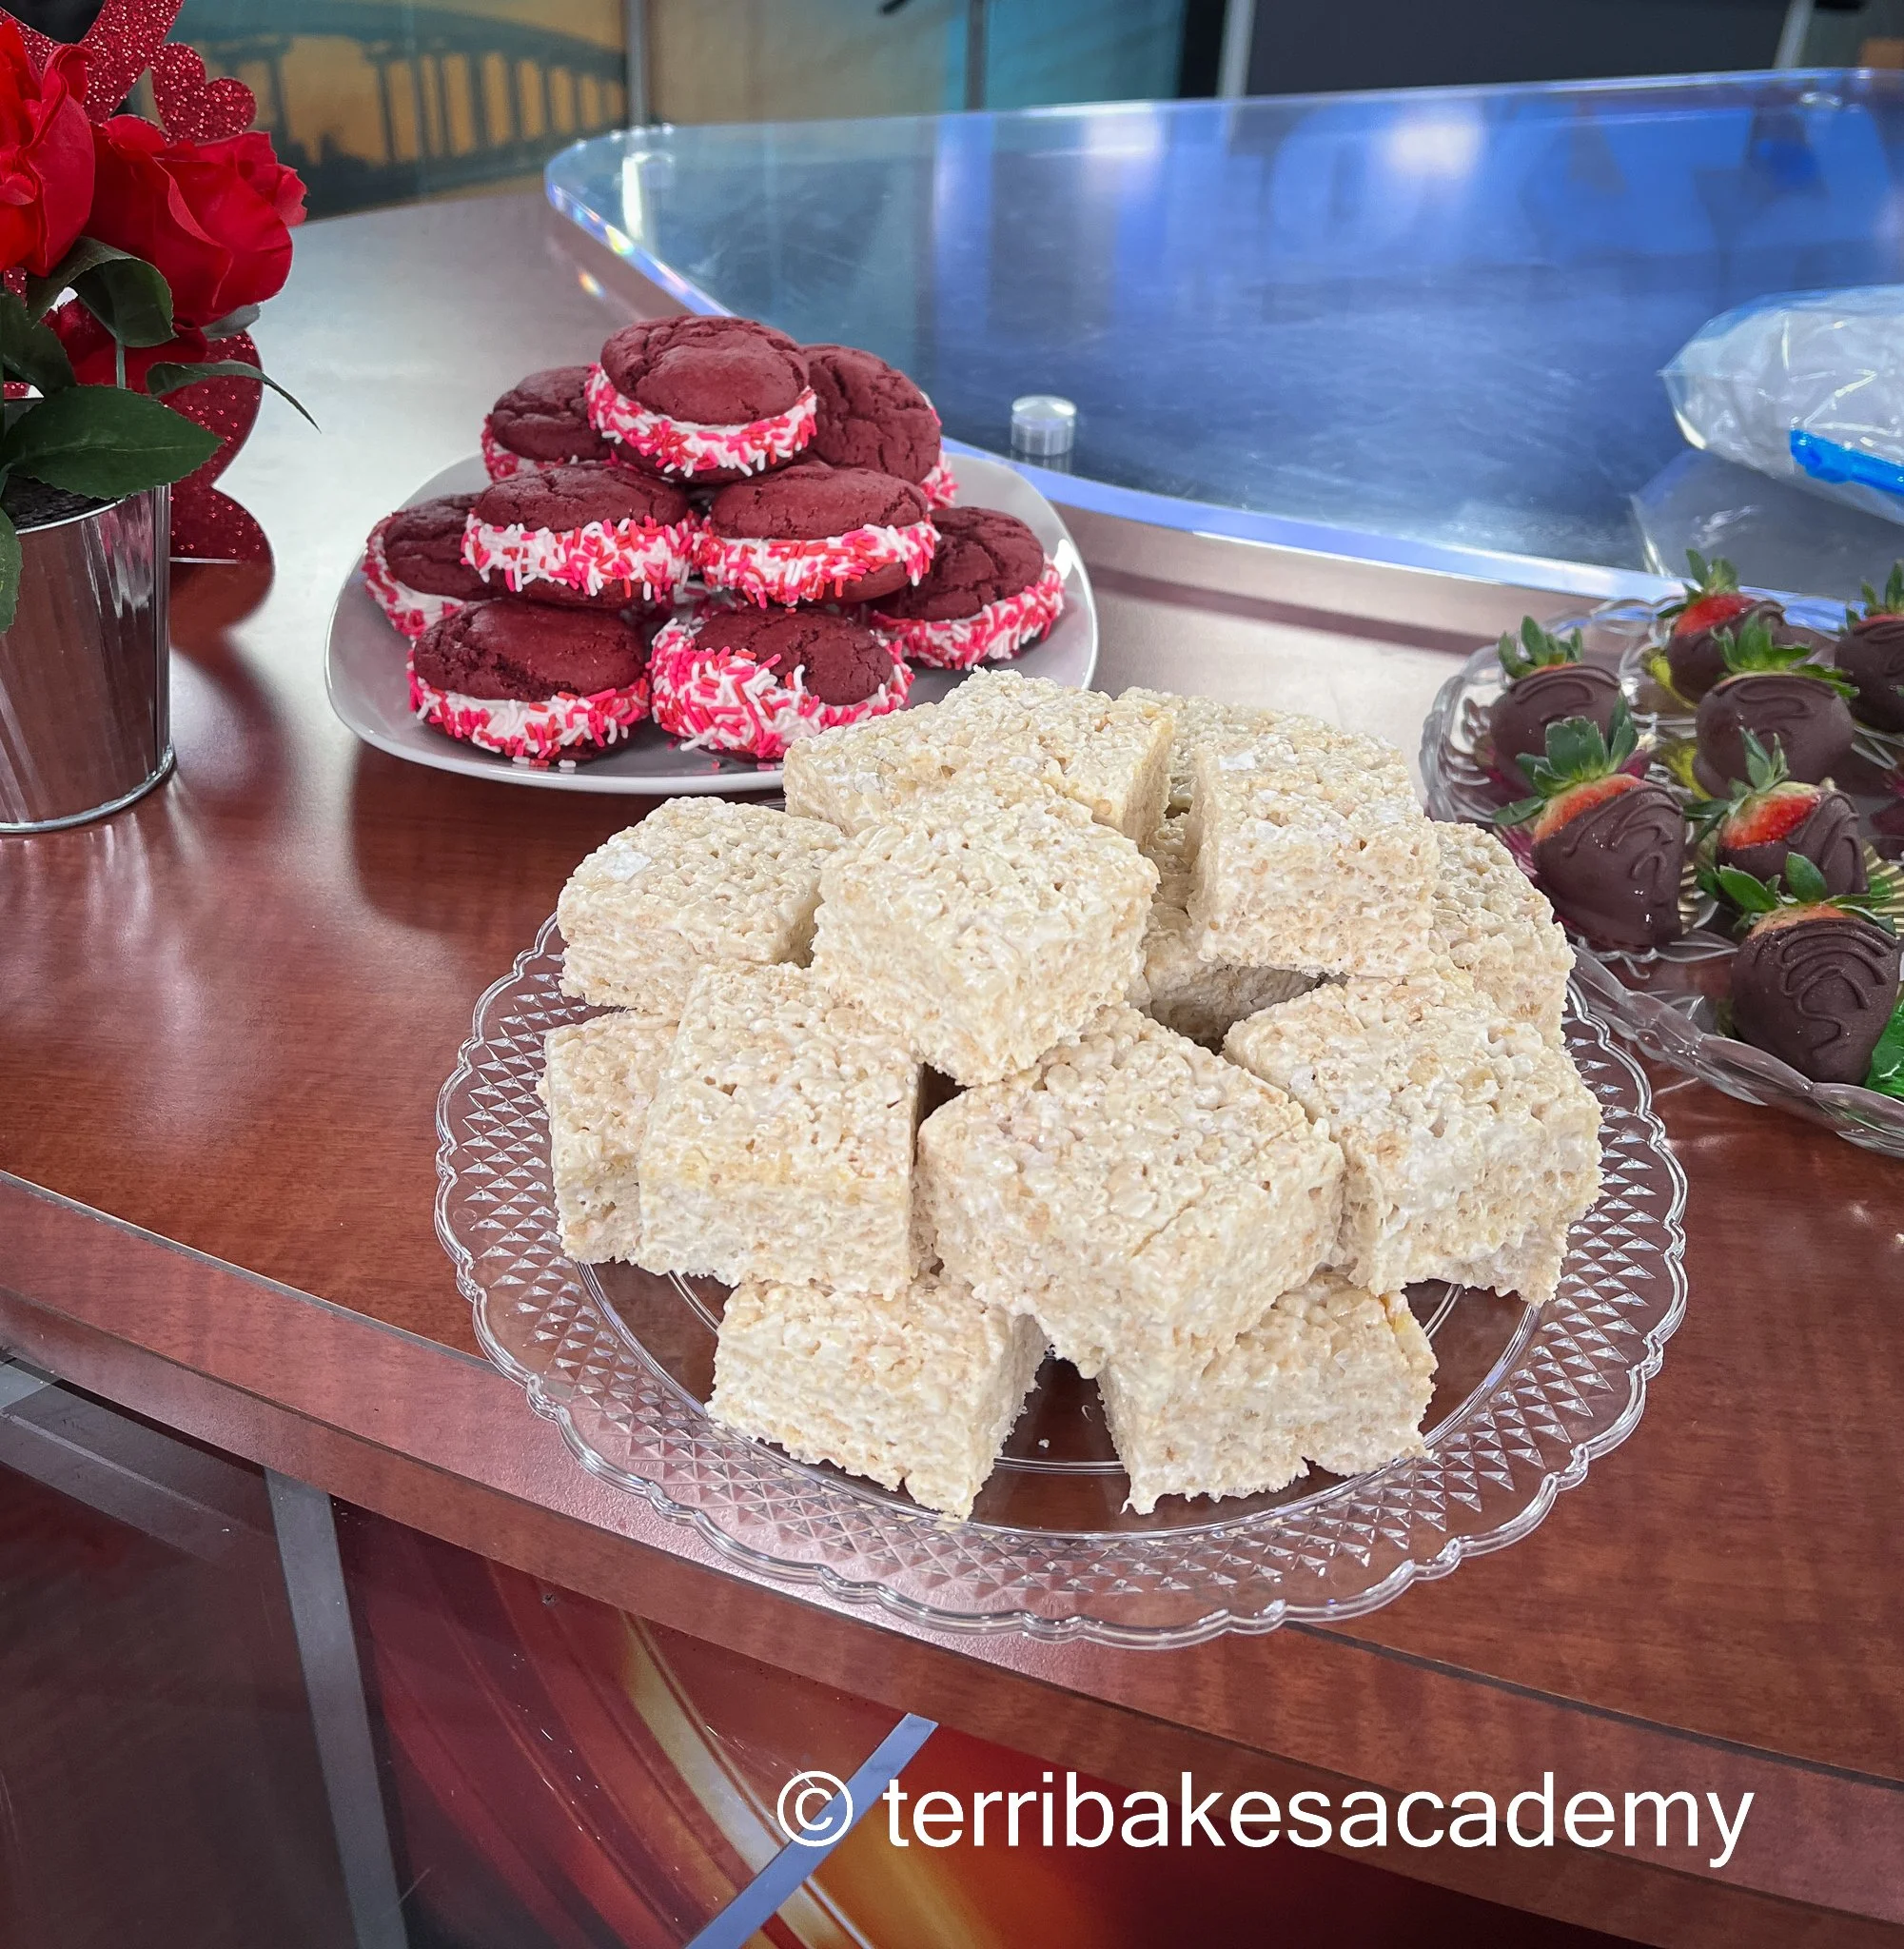
Brown Butter Rice Crispy Treats
Brown Butter Rice Crispy Treats
2 sticks (226 grams) unsalted butter
1 teaspoon vanilla extract
2 10-ounce bags of mini marshmallows
1 9-ounce box of crispy rice cereal
Flaky Sea Salt - to use taste
Line a 9×13-inch pan with nonstick aluminum foil.
Spray a wooden spoon with nonstick cooking spray
First, Brown the Butter:
Use a pan with a light-colored bottom, like stainless steel. This will allow you to see the butter better as it browns, making it easier to avoid burning it. Start by cutting your butter into uniform pieces. This helps the butter melt evenly. Place the butter pieces in the pan and melt over medium heat. Stir the butter gently as it melts to ensure even heating.
As the butter melts, it will foam. Keep stirring gently. The foam is part of the moisture in the butter evaporating.
After the foam subsides, the butter will begin to brown. You'll notice small brown bits forming at the bottom of the pan, and the butter will turn a golden brown. This is the milk solids caramelizing, which gives browned butter its distinctive flavor. Keep a close eye on the butter at this stage, as it can go from browned to burnt quickly. Browning butter usually takes about 5 to 8 minutes after the butter has melted, but this can vary depending on your stove and the amount of butter you're using.
When adequately browned, butter will emit a nutty aroma. Its color should be a rich golden brown. Use your nose and eyes to judge when the butter is done; it should smell toasty and delicious. When you think the butter is brown enough, add the vanilla, marshmallows, and Salt to the pan. Reduce the heat to low, stirring constantly until the marshmallows melt entirely. Remove from heat.
Add the rice cereal and stir with a nonstick sprayed wooden spoon until the cereal is evenly coated. Transfer the mixture into the prepared baking pan, pressing about one-half the mixture gently with your spoon into an even layer. Don't be too aggressive, pressing the mixture into the pan.
Sprinkle this layer with flaky Salt to your liking. Add the remaining mixture, again pressing gently and not being too aggressive. These will firm up after they cool. I'm just saying...
Using a gentle hand with this will give you chewy rice crispy treats.
Finish the top of your treats with a sprinkling of flaky sea salt; you decide how much you want - YOU DO YOU!
Allow to cool to room temperature for about 1 hour. Cut into squares and store in an airtight container at room temperature for up to 2 days- if they last this long.

Chocolate Dipped Strawberries
Chocolate Dipped Strawberries
Making chocolate-dipped strawberries is a simple and elegant treat that combines the freshness of strawberries with the richness of chocolate. Here's a basic recipe to create this delightful dessert:
Ingredients:
Fresh strawberries (as many as you'd like to make, with stems intact)
Chocolate of your choice (dark, milk, or white chocolate)
Optional: White chocolate for drizzling or toppings such as chopped nuts, sprinkles, or sea salt
Equipment:
Parchment paper or a silicone baking mat
A baking sheet
A microwave-safe bowl or a double boiler
A fork or toothpick (for dipping)
Instructions:
Prepare the Strawberries:
Rinse the strawberries under cold water and gently pat them dry with paper towels. The strawberries must be completely dried before dipping.
Prepare Your Workspace:
Line a baking sheet with parchment paper or a silicone baking mat. This is where you'll set the dipped strawberries.
Melt the Chocolate:
Microwave Method: Chop the chocolate into small, even pieces and place it in a microwave-safe bowl. Microwave it in 30-second intervals, stirring in between, until the chocolate is smoothly melted.
Double Boiler Method: Place the chopped chocolate in the top of a double boiler over simmering water. Stir occasionally until the chocolate has melted and is smooth.
Ready to Dip Chocolate: Follow the manufacturer's directions. Several brands are out there.
Dip the Strawberries:
Hold a strawberry by the stem and dip it into the melted chocolate, swirling gently to coat it evenly. Let the excess chocolate drip off by gently shaking the strawberry.
Set the Strawberries:
Place the chocolate-dipped strawberry on the prepared baking sheet. Repeat with the remaining strawberries.
Add Toppings (Optional):
If you use toppings like nuts or sprinkles, sprinkle them on the strawberries before the chocolate sets.
For a chocolate drizzle, melt a small amount of white chocolate and use a fork to drizzle it over the set of chocolate-dipped strawberries.
Chill:
Refrigerate the strawberries for about 15 minutes or until the chocolate has completely set.
Serve:
Enjoy your chocolate-dipped strawberries the same day for the best texture and flavor. They can be kept in the refrigerator for up to 24 hours, but the strawberries may start to sweat, or the chocolate may bloom (develop a white coating).

Brown Sugar Cut-Out Cookies
Brown Sugar Cut Out Cookies
Ingredients
4 sticks of unsalted butter
2 cups brown sugar
1 teaspoon salt
2 large eggs
3 teaspoons Lorann Butter Vanilla Bakery Emulsion
6 cups all-purpose flour
Instructions
Cream butter, brown sugar, vanilla, and a pinch of salt together in a stand mixer with the paddle attachment on low-medium speed for about 1 minute. Scrape down the sides of the bowl with a plastic spatula and mix again for a few seconds more. Over-mixing the butter and sugar in this step will cause fluffy cookies, and the dough will spread – and you won’t do that in cutout cookies.
Add eggs and mix. Scrape down the bowl again and mix again.
Add Butter Vanilla Emulsion to the mixing bowl and stir briefly.
Add the flour to the bowl and slowly start the mixer for about 30 seconds. Mix on low until the dough clumps around the paddle. Do not overmix.
Divide the dough and roll each half ¼ inch thick between 2 large pieces of parchment paper or plastic wrap.
Place in the fridge for at least 30 minutes. If you flatten the dough, it gets colder quicker. This will allow your dough to be firm to cut out cookies with sharp edges.
Preheat oven to 350°F.
Dip the cookie cutter in flour and cut your cookies into desired shapes. (I dip in flour before cutting each cookie. It helps keep their shape.) Place on a parchment-lined baking sheet. I chill cut-out cookies on the sheet pan while the oven is preheating and on each sheet before baking.
Every oven is different. I bake my cookies for 8-12 minutes and then rotate the baking sheets. The edges should begin to brown.
Once baked, let the cookie sheet sit for 1 minute to firm up. Transfer to a cooling rack so they can cool completely.
Royal Icing for Cut-Out Cookies
Made using only three ingredients, this easy royal icing recipe is great for outlining and flooding sugar cookies, decorating gingerbread houses, adding icing flowers to treats, and other intricate designs. Because this icing hardens as it dries, it’s not usually recommended for cakes and cupcakes, but it’s the perfect hard royal icing for sugar cookies with its smear-proof finish that will keep your fingers icing-free.
Royal icing decorations can be made weeks in advance and stored in an airtight container at room temperature for up to 6 months. Though traditionally made with raw egg whites, this royal icing is made without eggs, using Wilton Meringue Powder instead.
Ingredients
4 cups powdered sugar sifted
5 tablespoons warm water
3 tablespoons meringue powder
Directions
Beat all ingredients together until icing forms peaks. Beat for 7-10 minutes at low speed with a heavy-duty mixer or 10-12 minutes at high speed with a hand-held mixer.
At this point, check the consistency of your royal icing. If it is too stiff, add more water, 1 teaspoon at a time, until the desired consistency is achieved. If it is too thin, add powdered sugar, a little at a time, until the desired consistency is achieved.
For stiff consistency, Use 1 tablespoon less water. Stiff royal icing is preferred for making 3-D decorations. With stiffer royal icing, opt for larger piping tips to relieve the pressure on the piping bag.
Medium consistency for icing outlining: Add 1/8 teaspoon of water for every cup of stiff icing. Use a flat utensil, like a small angled or straight silicone spatula, to mix icing in a figure-8 motion. Avoid beating or mixing vigorously.
Thin consistency for flooding: To thin for pouring, add 1 teaspoon of water per cup of royal icing. Use a grease-free spoon or spatula to stir slowly. Add 1/2 teaspoon water at a time until you reach the proper consistency. Use a flat utensil, like a small angled or straight silicone spatula, to mix in a Figure 8 motion. Avoid beating or mixing vigorously.
10-second test: Take some icing on a spatula and drop it back into the bowl to check for the correct thin consistency for flooding. If it sinks after a full count of 10, the consistency is thin enough for flooding.
Let the icing sit for 15 minutes to an hour to let air bubbles rise naturally. Alternately, tap the bowl on the table several times to force the air bubbles up. Gently stir the top surface to release the air.
NOTE: Use Meringue Powder: Meringue Powder is a must for this recipe. Do not substitute with raw egg whites (which can be a food safety issue) or dried egg whites; neither will produce the same results as Meringue Powder.
Don't overbeat: Do not overbeat the royal icing base. This will incorporate too much air, which will create bubbles. Vigorous stirring will also create air bubbles.
Cover with a damp towel: Cover the decorating tip with a warm, damp towel to prevent the royal icing from drying when not using.
To speed up the drying process, Royal icing can take up to 2 hours to dry. To speed up the drying process, place iced treats in front of a fan.
Storage: Store royal icing in an airtight container at room temperature for up to two weeks. Before reusing, re-whip using a paddle attachment on low speed until it's back to the correct consistency.
Never store royal icing decorations in the freezer. Instead, keep decorations in an airtight container in a dry, dark place to prevent fading for up to 6 months.